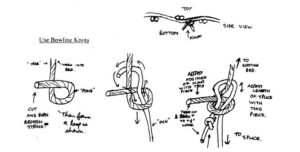
Learn how to tie a bowline knot
Splice in short pieces with knots that are placed under the bed. (If two strings are broken you should stagger the knots). Burn off any frayed broken string so the repair is using only good string from the bed. There is no need to go right across the bed with a repair.
“The fish jumps out of the pond, goes around the tree and then back into the pond” Normally the pond will be made with existing bed material, the “fish” will be new splice string.

Tie a half hitch as a keeper in the fish end of the knot, and pull it up tight to the pond when the knot is finished to stop slippage. The Pond end will not slip.
Be careful when Burning ends not to set the bed on fire! Beware that if your bed had more than about five repairs in the central area of the bed, it should be replaced.
Getting the Tension Right
Before tying the second knot of the splice, pull the strings that were broken inward so they “wiggle” the same amount as the nearby never broken strings. If the repairs are done in a timely fashion you can usually see where the string aligns. Then take off a few springs on each side so that the splice can be as tight, or a bit tighter (in case the last knot slides a bit as you tighten it) than the original piece.
Use a paper clip to create a tool. Open one end to create about 3cm of straight wire sticking out. Then fabricate, using needle nose pliers, at the end of that straight wire, a small hook of about 2mm diameter. This tool can be used here to help pull the splice up through the bed to create the missing weave. The tool will not be needed, at this stage, for those repairs which are close enough to the bed’s edge that you can create the missing weave by reaching both the top and the underside of the bed with your hands.
This same tool can later be used to hook around the “fish” part of the loosely tied knot, right where it passes behind the “tree”, to help tighten the second knot to correct tension before the keeper half hitch is added. Basically when you pull the spare splice string over the pulley created by the wire hook (placed behind the “tree” and held tight) you shorten the splice length without opening or moving the placement of the knot. The placement of the pond or main knot is adjusted to sit underneath the bed before the splice length is adjusted. Before adding the keeper knot to finish the splice you can compare your splice to nearby strings for equal tension by pressing down. (Knots may be glued using white wood glue, to reduce the possibility of slippage).
Time Saving Trick
If your splice is near the edge of the bed, splice in some repair string using bowline knots to extend one or both (sometime one of the two original strings is still good) of the good string past the edge of the bed by at least 2.5 inches. Make sure they are woven properly and after passing through the slot in the clip that they are on opposite sides of the border rope from each other. Then the splice can now be finished by placing a simple half hitch knot in the double strings at the back of the border rope. This is an easier way to tension your repair to the correct length.

